Built-In Microwave Installation: Trim Kit, Cabinet Fit, and Electrical
Built-in microwaves aren't the same as over-the-range. Here's how trim kits work, what cabinet dimensions you actually need, and when you need an electrician first.
Built-In Microwave Installation: Trim Kit, Cabinet Fit, and Electrical
A built-in microwave is one of those installs that looks simple from the outside and then surprises you once you get into it. Not because it’s complicated — but because there are three different things that have to be right at the same time: the cabinet opening, the trim kit, and the electrical. If any one of those is wrong, you’re stopping mid-job.
I’m talking about the cabinet-mounted type here — not the over-the-range microwave that hangs on the wall above the stove. That’s a different animal (I have a separate guide for OTR microwaves). Built-in means the microwave sits inside a cabinet, flush with the face, often in a tall tower cabinet or a wall cabinet dedicated to the appliance.
Here’s how I approach these.
Built-In vs. Countertop Microwave in a Trim Kit
First thing to sort out: some built-in microwaves are designed specifically for cabinet installation and come with their own mounting hardware. Others are countertop microwaves that can be converted to built-in use with a separate trim kit.
The trim kit is a frame that surrounds the microwave and covers the gap between the appliance and the cabinet opening. It gives you that flush, finished look. Without a trim kit on a countertop-to-built-in conversion, you’ve got an ugly gap and no proper ventilation management.
The trim kit must match the specific microwave model. This is not negotiable. A trim kit from one brand will not fit a different microwave, and even within the same brand, different models have different kits. If someone bought a microwave and a trim kit separately and they’re not a matched pair, we find that out when nothing lines up and the mounting holes don’t match.
If you’re buying new: buy the microwave, then look up the trim kit for that exact model. Most manufacturers list compatible trim kits on the product page.
Cabinet Opening: What Actually Matters
The microwave needs to fit inside the cabinet opening with the right amount of clearance. Typically:
- Width: opening width should be within 1/4 inch of the trim kit width specification
- Height: opening height should match the kit spec, usually with a 1/4 inch tolerance
- Depth: cabinet depth needs to be sufficient for the microwave body plus the mounting hardware — most built-in microwaves are 15-16 inches deep, and most wall cabinets are 12 inches deep, which means this only works in a dedicated tall cabinet or a full-depth section
That depth issue is the one that trips people up most. A standard wall-upper kitchen cabinet is 12 inches deep. A microwave is 15 inches deep. The microwave won’t fit inside that cabinet — it’ll stick out several inches in front of the cabinet face. This is only going to work in a tall pantry-style cabinet (usually 24 inches deep) or in a cabinet that was specifically built out for this purpose.
Before anything else, I measure the existing opening. If the opening is too small, that’s a cabinet modification — which is outside my scope. Cabinet work is a carpenter’s job. I can do the appliance install once the opening is right.
Clearing the Cabinet
Here’s something the instructions gloss over: you need the inside of the cabinet to be clear and accessible during the install.
The top mounting screws on most built-in microwaves go through the bottom of the cabinet above (or the top shelf of the opening) down into the top of the microwave or trim kit. You’re reaching inside the cabinet to drive those screws. If the cabinet has shelves, removable dividers, or old items stored in it, all of that has to come out before we start.
The ventilation cutout in the back of the cabinet (if there is one) also matters. Most built-in microwaves vent through the front — they have vents on the door or the face — so a rear cabinet opening isn’t always required. But check the model’s installation sheet. Some require rear clearance for airflow.
Electrical: What Needs to Be in Place Before I Arrive
Built-in microwaves typically require a dedicated 20-amp, 120-volt circuit — same as over-the-range units. They draw significant power when cooking, and you don’t want that shared with other outlets.
What “dedicated” means: that circuit only serves the microwave. Nothing else is on it.
The outlet needs to be inside the cabinet — accessible to the microwave’s power cord. Most built-in microwaves have a cord that’s 3-4 feet long, so the outlet needs to be within that reach, usually at the back of the cabinet interior or high on the rear wall of the opening.
If there’s no outlet in the cabinet: that’s an electrician job before we can proceed. I’m not a licensed electrician, and I don’t do electrical rough-in. Hardwired microwaves (where there’s no plug, just wires coming out of the wall) are also an electrician call — they need to terminate the circuit safely with the right box and connection. My scope starts once the electrical is already in place.
So: if this is a new installation in a location that’s never had a built-in microwave, get an electrician out first. If you’re replacing an existing built-in microwave that was already working, the circuit is already there.
What I verify before touching the appliance:
- Outlet is present and accessible
- Circuit is 20 amps (look at the breaker in your panel — it’s labeled, usually 20A)
- Outlet is grounded (3-prong)
If any of those aren’t right, I flag it before we go further.
The Install Sequence
Once the opening is right and the electrical is confirmed, here’s how the actual install goes:
1. Attach the mounting plate or bottom rail to the cabinet
Most trim kit systems include a lower mounting rail that attaches to the bottom of the cabinet opening. This is what the microwave slides onto and rests against. It needs to be level — use a level, don’t eyeball it.
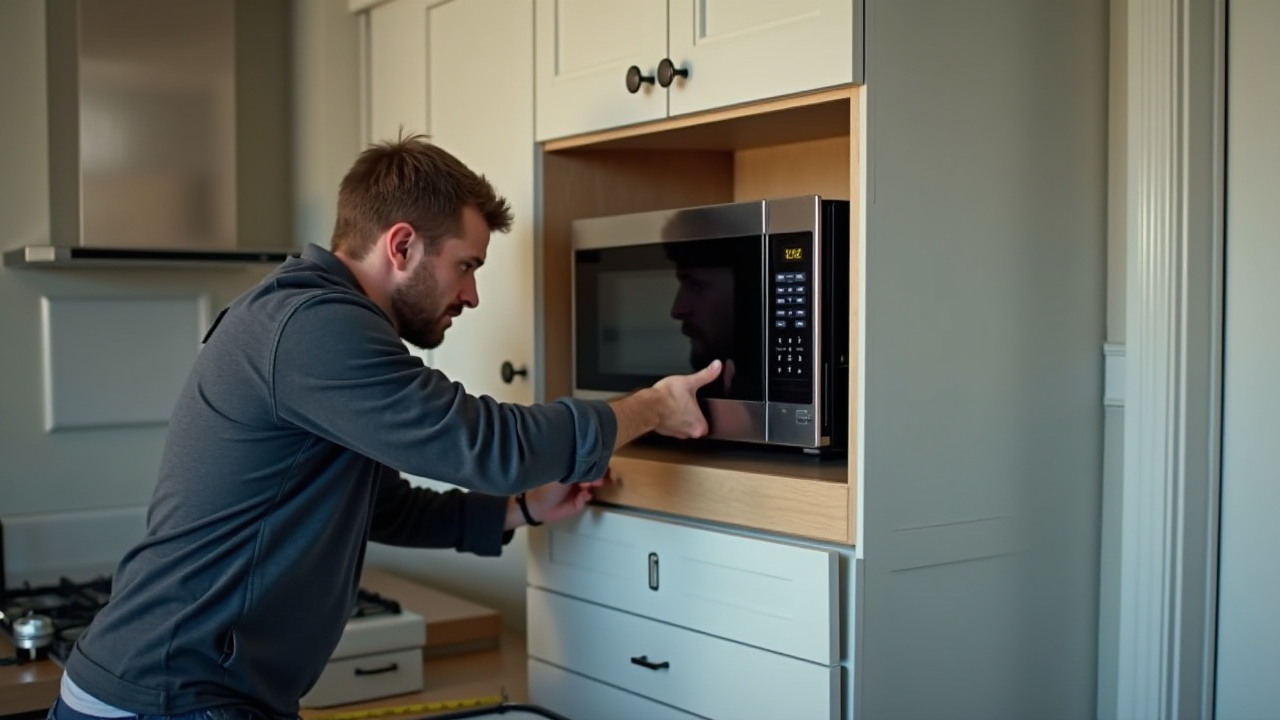
2. Slide the microwave into the opening
With the lower rail in place, tilt the microwave in and let the bottom rest on the rail. Have help for this — these units run 50-70 lbs on average and you’re often working at head height or above.
3. Drive the top mounting screws
Reach up inside the cabinet above and drive screws through the cabinet floor down into the top of the trim kit or microwave body. This is why you need that upper cabinet clear. The specific screw locations depend on the model — follow the installation sheet, not guesswork.
4. Attach the trim kit frame
The trim kit frame snaps or screws onto the front of the microwave, covering the gap around the perimeter. Most have clips on the sides and top. Once the frame is seated, it should be flush with the cabinet face on all sides.
5. Plug it in and test
Before pushing anything final, plug the unit in. Run it on high for 30 seconds with a cup of water inside to confirm it powers up and heats. Check that the door closes cleanly and the latch catches. Make sure the interior light works and the turntable spins (if it has one).
Common Problems I Run Into
The trim kit doesn’t cover the full gap — usually means the wrong trim kit for the cabinet opening size. Trim kits come in different dimensions. Measure the opening and the kit before you buy.
The microwave doesn’t sit flush — usually a level issue on the mounting rail, or the microwave is catching on the cabinet face somewhere. Check that the front edge of the cabinet opening is smooth and that there’s no lip interfering.
The door is hard to open — sometimes the trim kit frame is pressing against the door edge slightly. Loosen and reposition the frame. A few millimeters makes a difference.
No power when plugged in — check the breaker first, then the outlet with a tester. If the outlet is dead and the breaker is on, call an electrician.
Drawer Microwaves
Drawer microwaves are a variation of the built-in type — they pull out horizontally like a drawer rather than having a door that swings open. The install principles are similar (cabinet opening, trim fit, dedicated circuit) but the mounting is different, and drawer microwaves are significantly heavier. I handle those case-by-case because the cabinet support requirements are more specific.
What This Install Costs (Rough Estimate)
I charge a flat rate for standard appliance installations. Built-in microwaves are slightly more involved than countertops or OTRs because of the cabinet fit work, so expect it to run a bit higher than a straightforward swap.
If you’re in Milledgeville, Macon, or surrounding middle Georgia, call me at (478) 280-4099 or book at proapplianceinstalls.com. I’ll tell you upfront if the electrical needs to be dealt with first so you’re not waiting on me while I wait on someone else.