Range Hood Installation: The Pro's Guide to Getting It Right the First Time
A professional installer's complete guide to range hood installation — ducted and ductless. Duct sizing, CFM requirements, mounting heights, and the mistakes I see on every bad install.
Tools & Materials Needed:
Why Range Hood Installs Get Botched So Often
I’ve walked into more kitchens than I can count where a homeowner — or worse, a “handyman” — installed a range hood and got it wrong. Wrong duct size, wrong height, flex duct stuffed into a wall like a garden hose, or a 900 CFM hood on a 4-inch duct that sounds like a jet engine and moves zero air.
Range hood installation is one of those jobs that looks simple. Mount a box to the wall, plug it in, done. But the ventilation side is where things get complicated fast. Get the ductwork wrong and you’ve got a hood that’s loud, ineffective, and potentially pushing carbon monoxide back into your kitchen.
This is the guide I wish someone had given me years ago. I’ve installed hundreds of range hoods — under-cabinet, wall-mount, island — and I’m going to walk you through exactly how a pro does it.
Ducted vs. Ductless: Let’s Settle This
Ducted (vented) range hoods push air through ductwork to the outside. This is what you want. It actually removes smoke, grease, moisture, and odors from your kitchen.
Ductless (recirculating) range hoods pull air through charcoal filters and blow it back into the kitchen. They catch some grease and reduce some odors, but they don’t remove heat or moisture. They’re a compromise when exterior venting isn’t possible — like in some condos or apartments.
My honest recommendation: Go ducted every single time if you can. I’ve had customers switch from ductless to ducted after one Thanksgiving of trying to cook a turkey with a recirculating hood. The difference is night and day.
If you’re stuck with ductless, replace those charcoal filters every 3-6 months. Most people forget and wonder why their hood “doesn’t work anymore.”
CFM: How Much Power Do You Actually Need?
CFM stands for cubic feet per minute — it’s how much air the hood moves. Here’s the real-world breakdown:
- Standard electric cooktop (4 burners): 300-400 CFM is plenty
- Gas cooktop (standard 4 burners): 400-600 CFM minimum. Gas produces combustion byproducts — you need more ventilation
- Pro-style gas range (high BTU): The rule of thumb is 1 CFM per 100 BTU. A 60,000 BTU range needs 600 CFM minimum. I’d go 900+
- Electric induction: 300-400 CFM. Induction doesn’t produce combustion gases, so you mostly need it for smoke and steam
The mistake people make: Buying a 1200 CFM monster hood for a basic 4-burner electric cooktop. Overkill creates problems — it’s loud, expensive, and in some cases it can create negative pressure in your house that backdrafts your water heater or furnace. Not a joke. Some codes require makeup air systems for hoods over 400 CFM.
Check your local codes. In many jurisdictions, anything over 400 CFM requires a makeup air solution. I always tell customers this before they buy. Nobody wants to spend $2,000 on a hood and then find out they need another $1,500 in makeup air work.
Duct Sizing: The #1 Thing People Get Wrong
This is where 90% of bad installs go wrong. Here’s the rule:
| Hood CFM | Minimum Duct Diameter | Recommended |
|---|---|---|
| Up to 400 | 6” round | 6” round |
| 400-600 | 6” round | 8” round |
| 600-900 | 8” round | 8” round |
| 900-1200 | 8” round | 10” round |
| 1200+ | 10” round | 10” round |
Never go smaller than what the hood manufacturer specifies. If the hood has a 6” outlet, don’t reduce it to 4” to fit an existing hole. You’ll choke the airflow, the motor works harder, it gets loud, and it doesn’t ventilate properly.
Use rigid or semi-rigid duct whenever possible. Flex duct is the enemy of airflow. Every bend, every crinkle, every foot of flex duct reduces your effective CFM. I’ve measured installs where a 600 CFM hood was only pushing 250 CFM at the wall cap because someone used 10 feet of kinked flex duct with three 90-degree turns.
If you have to use flex duct (sometimes you do in tight spaces), keep it as short and straight as possible. Stretch it fully — don’t let it compress. And use foil tape on every connection, not cloth duct tape. Cloth duct tape fails within a year or two.
The Duct Run Rules
- Shorter is better. Every foot of duct reduces performance
- Fewer turns is better. Each 90° elbow equals roughly 5-8 feet of straight duct in airflow resistance
- Never duct into an attic or crawl space. It has to terminate outside. Dumping hot, greasy, moist air into your attic is a mold factory and a fire hazard
- Use a proper wall cap or roof cap with a damper (backdraft flap). This keeps cold air, bugs, and critters out when the hood isn’t running
- Don’t use screens on the cap. They clog with grease fast and cut airflow by 20-50%. The damper flap is enough
Mounting Height: There’s a Sweet Spot
The distance between your cooktop surface and the bottom of the hood matters more than people think:
- Electric cooktop: 20-24 inches above the cooking surface
- Gas cooktop: 24-30 inches above the cooking surface (gas flames + lower mounting = fire risk)
- Check the manufacturer’s specs — they’ll specify a range. Don’t go lower than their minimum
Too low: You’ll bang your head on it, pots won’t fit, and it can be a fire hazard with gas burners.
Too high: The hood can’t capture the smoke and steam before it disperses into the kitchen. Anything over 30” and you’ve basically got a decorative ceiling fan.
I mark the height with painter’s tape before I drill anything. Stand at the stove, mime cooking, make sure it’s not going to be in your face. Then verify with a tape measure.
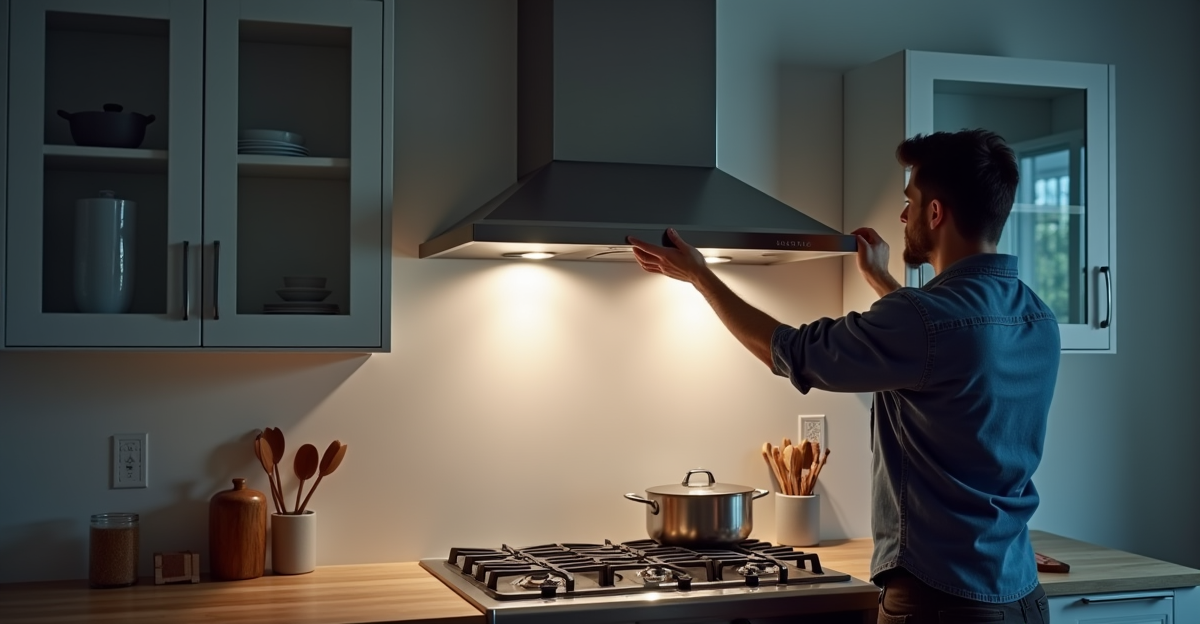
Step-by-Step: Under-Cabinet Range Hood Install
This is the most common install I do. Replacing an over-the-range microwave with a dedicated range hood, or swapping an old hood for a new one.
What You Need Before You Start
- The new range hood (obviously)
- Ductwork: rigid preferred, sized to match the hood outlet
- Wall cap or roof cap with damper
- Foil HVAC tape (NOT cloth duct tape)
- Sheet metal screws
- Wire nuts and electrical tape
- A helper (these things are awkward to hold while drilling)
Step 1: Kill the Power
Turn off the breaker for the range hood circuit. Verify with a non-contact voltage tester. If you’re replacing an over-the-range microwave, there may be a dedicated outlet in the cabinet above — verify that’s dead too.
Step 2: Remove the Old Unit
Take out the filters and any removable parts first. Disconnect the electrical (unplug or disconnect hardwired connections). Remove mounting screws. If it’s an OTR microwave, there’s usually a mounting plate on the wall and bolts through the cabinet above — you’ll need a second person to support the weight while you remove the hardware.
Step 3: Plan the Duct Route
This is where you need to think before you cut. Options:
- Through the back wall — ideal if there’s an exterior wall behind the hood. Shortest, most direct route
- Up through the cabinet and out the roof — common but involves more ductwork
- Up through the cabinet, then horizontal through a soffit or chase to an exterior wall
Pick the shortest path with the fewest turns. Mark where you need to cut holes.
Step 4: Cut the Duct Opening
If going through an exterior wall, you’ll need a hole saw or reciprocating saw. From inside, drill a pilot hole first, then cut from the outside. For brick or stone, you’ll need a masonry hole saw — rent one, don’t buy.
For going up through the cabinet, use a hole saw sized to your duct. Clean cut, centered on the hood outlet.
Measure three times. Cut once. I cannot stress this enough. A misplaced duct hole in your exterior wall is not a fun fix.
Step 5: Install the Ductwork
Start from the wall/roof cap and work back to the hood. Connect each section with sheet metal screws (3 per joint minimum) and seal every seam with foil tape. Make sure joints overlap with the airflow direction — downstream piece goes inside the upstream piece. This prevents grease from leaking at the seams.
Step 6: Mount the Hood
Most under-cabinet hoods mount with screws through the bottom of the cabinet above, or through a mounting bracket into the wall. Use the template that comes with the hood — tape it to the cabinet bottom and mark your holes.
Find the studs if mounting to a wall. Range hoods are heavy, especially once you add the weight of ductwork. Toggle bolts in drywall alone won’t cut it.
Have your helper hold the hood in position while you drive the mounting screws. Connect the duct to the hood outlet and seal with foil tape.
Step 7: Electrical Connection
Most under-cabinet hoods just plug into an outlet inside the cabinet above. If there’s no outlet, you may need one installed — that’s electrician territory unless you’re comfortable with that work and your local code allows homeowner electrical.
If the hood is hardwired, connect inside the junction box: black to black, white to white, green/bare to ground. Wire nuts, wrapped with electrical tape, cover plate on.
Step 8: Test Everything
- Turn the breaker back on
- Test all fan speeds — listen for rattling or vibration
- Test the lights
- Hold a piece of tissue paper near the hood on high — it should get sucked up and held
- Go outside and verify air is actually coming out of the wall/roof cap
- Check that the damper flap opens when the fan runs and closes when it stops
Pro move: Turn on a burner and let some steam rise. Watch how the hood captures it. If steam is escaping to the sides, the hood might be too high or underpowered for the cooktop.
Wall-Mount Range Hood: Key Differences
Wall-mount hoods (the chimney-style ones) are increasingly popular in kitchen remodels. The principles are the same, but:
- They’re heavier. You absolutely must hit studs. Use a mounting bracket rated for the weight
- The chimney covers hide the ductwork — but the ductwork still has to be right. Don’t get lazy just because it’s hidden
- Height adjustment is built into the chimney sections — they telescope. But the hood body itself mounts at a fixed point, so get that height right before drilling
The 5 Mistakes I See on Every Bad Install
- Undersized duct. A 900 CFM hood on a 4” duct. Loud, useless, and burns out the motor early
- Flex duct everywhere. Kinked, compressed, too long. Use rigid duct and keep runs short
- No damper on the wall cap. Cold air pours in all winter. Bugs and birds get in. One customer had a bird nest in their duct — wondered why the hood smelled
- Duct terminates in the attic. Grease-laden, moist hot air in your attic is asking for mold and a potential fire. Must go to the exterior
- Mounted too high. “I didn’t want it in my face” — now it doesn’t catch anything. Respect the 20-30 inch range
When to Call a Pro
You should seriously consider hiring someone if:
- You need to cut through brick, stone, or stucco
- The duct run is complex (multiple turns, long distances)
- You need electrical work and aren’t 100% confident
- You’re installing a hood over 600 CFM and may need makeup air
- It’s an island mount (ceiling mount) — these are genuinely difficult
There’s no shame in calling a professional for the duct and electrical work, then mounting the hood yourself. A bad duct job will make even a $2,000 hood perform like a $50 fan.
Tools I Recommend
A few tools that make this job dramatically easier:
- A good stud finder — not the $10 one from the checkout aisle. I use the Franklin ProSensor T13 and it’s never let me down
- Foil HVAC tape — 3M foil tape is my go-to. Accept no substitutes
- A quality hole saw kit — you’ll need one for the duct penetration. Diablo hole saw kits are solid
- An oscillating multi-tool — for those tight cuts where a reciprocating saw won’t fit. DeWalt oscillating tool is what I carry
Final Thoughts
Range hood installation is one of those jobs where doing it right takes the same amount of time as doing it wrong — you just need to know what “right” looks like. Size your duct properly, keep runs short and straight, mount at the correct height, and seal everything with foil tape.
Your kitchen will smell better, your cabinets won’t get that greasy film, and you’ll actually be able to sear a steak without setting off every smoke detector in the house.
If you’re in the Macon, Warner Robins, or middle Georgia area and want a range hood installed by someone who does this every day, check out Pro Appliance Installs. Flat rate: $165 for a standard range hood installation including removal of the old unit.
If you’ve got questions about your specific setup, drop a comment or reach out. Every kitchen is different, and sometimes a five-minute conversation saves hours of headaches.
Stay safe out there.
*Pro Install Guy is your local appliance installation specialist serving Macon, Milledgeville, Perry, and middle Georgia. Book an install at proapplianceinstalls.com or call (478) 280-4099.
Need a Standard Range Hood Install?
Owner-operated • Supported Middle Georgia service • 90-day workmanship warranty
Pro Appliance Installs handles supported range hood installation in Macon, Warner Robins, and Milledgeville, GA. Standard installs are flat-rate; any install-side extras are quoted before additional work continues. Upstream plumbing, gas-line, or electrical work should be handled by the appropriate licensed pro.